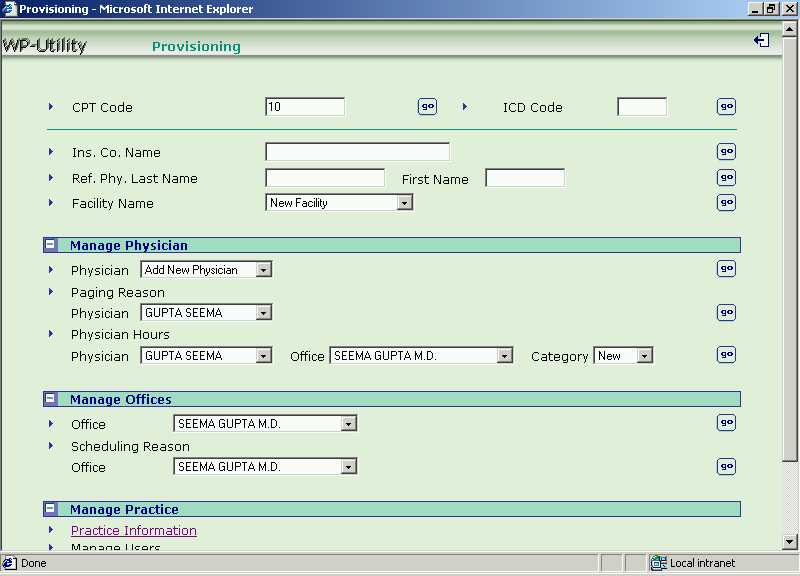
Provisioning WebPractice
One has to maintain master information for any
software solution. This chapter explains the provisioning of data into these master
tables necessary for the smooth working of WebPractice. By clicking on the
Provisioning Tables link under the Utilities on the WebPractice main menu, the following screen
for Provisioning Tables is displayed. Through this
screen, all the master tables will be provisioned.
The following sections will explain the logical order in which the information in these
tables needs to be provisioned.
Screen 1 - Provisioning Tables Main Menu
This menu
option maintains all the information pertaining to a
practice.
To provision the practice related information,
click on Manage Practice -> Practice Information.
The following screen is displayed.
Screen 2 - Practice Information
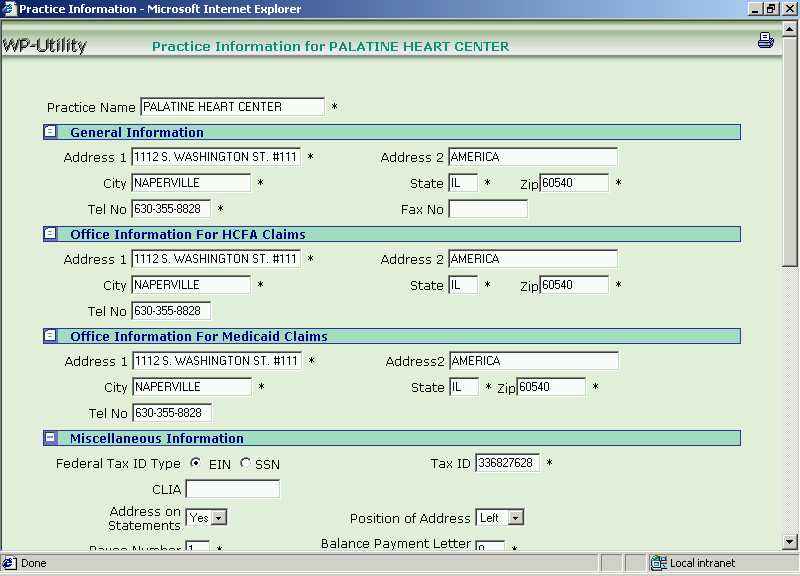
The practice related information includes:
On entering / modifying the above practice information, click on [Update] to update the information. [Cancel] will one take back to the Provisioning Page without saving the changes if any.
Manage Users
Only the super user can add login information for a new user or modify or delete the
login information of an existing user.
Add New User Login
To add login information for a new user, click on Utilities -> Provisioning Tables -> Manage Practice. The Manage Users option is displayed. Against the "User Id", select the [Add New Login] from the drop-down list box, and click the [Go] button. The following screen will be displayed.
Screen 3 - New User Login Information
Fill in the information and click on the [Add] button to add the new user login information. [Cancel] button will take one back to Provisioning Page.
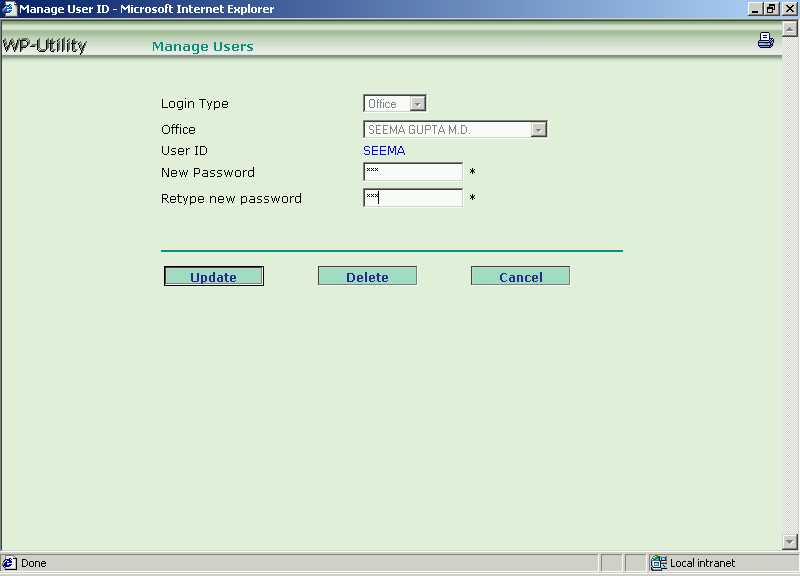
Update Password / Delete User Login
To update password or delete the user login information, click on Utilities -> Provisioning Tables -> Manage Practice. The Manage Users option is displayed. Against the "User Id", select the [Existing User Login Name] from the drop-down list box, and click the [Go] button. The following screen will be displayed.
Screen 4 - Update / Delete User Login Information
Modify the password and click on [Update ] button to update the user's password, or click the [Delete] button to delete the user information. A user who is deleted, will not be able to login and access WebPractice. [Cancel] button will take one back to Provisioning Page.
This option allows one to maintain the information for all
the physicians in a practice - their claims related details, paging reasons and their
office hours.
To provision the physician details,
click on Utilities -> Provisioning Tables -> Manage Physicians.
Physician Information
One can add / update / delete the information of a physician. The
information includes :-
Add New Physician
To add a new physician, click on Utilities -> Provisioning Tables -> Manage Physicians. The Physician option is displayed. Against the "Physician", select the [Add New Physician] from the drop-down list box, and click the [Go] button. The following screen will be displayed.
Screen 5 - Add New Physician
Enter the physician information mentioned above and click the [Add] button to add a new physician. [Cancel] button will take one back to the Provisioning Page.
On clicking the [Add] button, you can go to WebReferral Physician Information screen. This is the physician information screen which you get through the [Physician Locator] option. The physician can add office for his practice from this screen.* Note :- Please refer to the User Manual of WebReferral for the details of adding new office details of the physician practice.
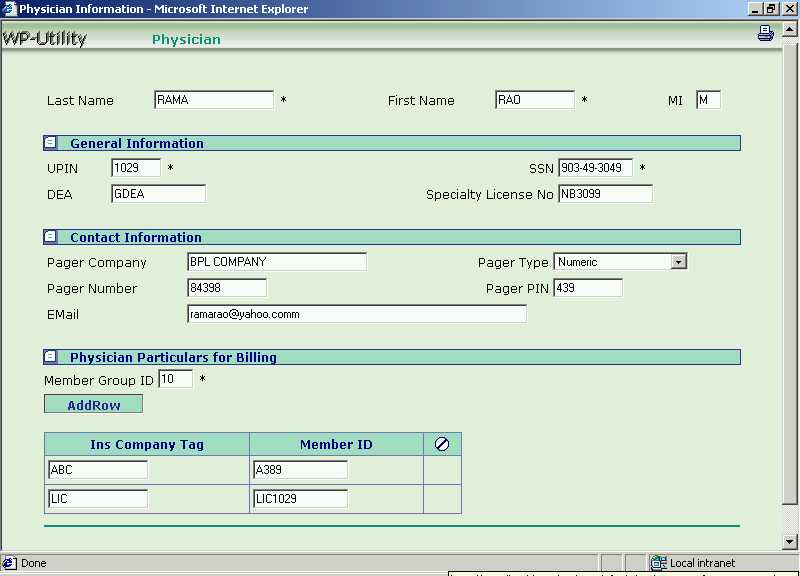
Update / Delete the Physician
To update / delete any physician from the domain, click on Utilities -> Provisioning Tables -> Manage Physicians. The Physician option is displayed. Against the "Physician", select the [Existing Physician Name] from the drop-down list box, and click the [Go] button. The following screen will be displayed.
Screen 6 - Update / Delete Physician
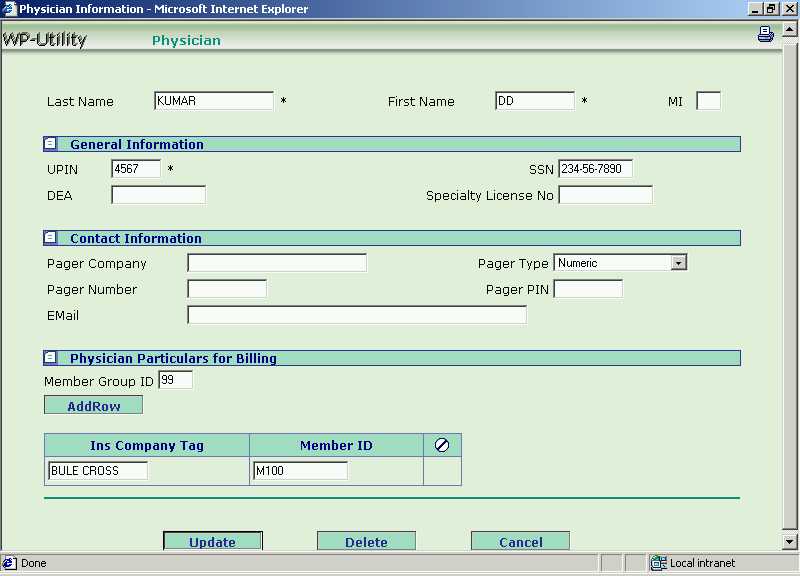
Update the physician information and click the [Update] button, or click the [Delete] button to delete the physician from the domain.
From the billing particulars, the Insurance Company Tag can also be deleted. Tick the check box adjacent to the insurance company and click [Update] button.
[Cancel] button will take one back to the Provisioning Page.
Paging Reasons
One can add / update / delete the reasons for paging a physician. This will allow patients
to page their physicians from their access page.
Add New Paging Reason
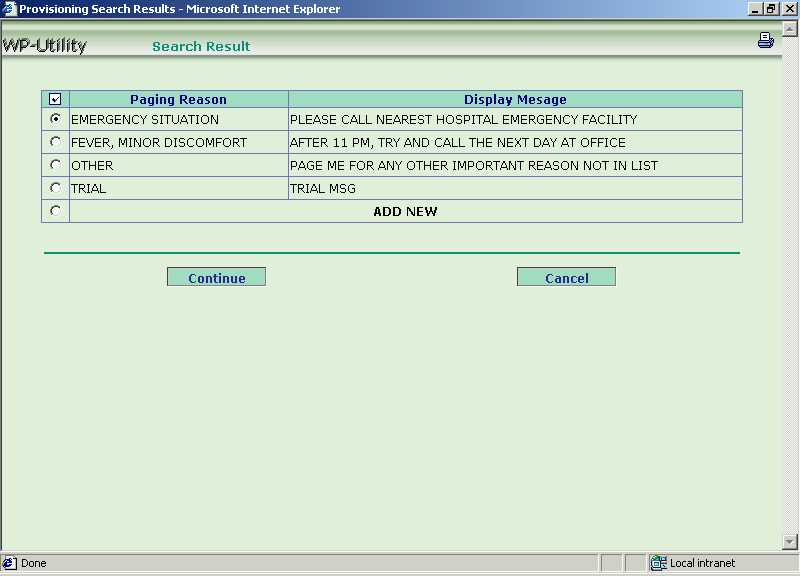
To add a new paging reason, click on Utilities -> Provisioning Tables -> Manage Physicians. The Paging Reason option is displayed. Against the "Physician", select the [Existing Physician Name] from the drop-down list box, and click the [Go] button. The following screen will be displayed.
Screen 7 - Paging Reason Search Result
Various Paging Reason Codes and their corresponding Messages to be displayed on a pager are displayed. Click on the radio button adjacent to [Add New] row to add new paging reason. Then click [Continue] button. See the following screen.
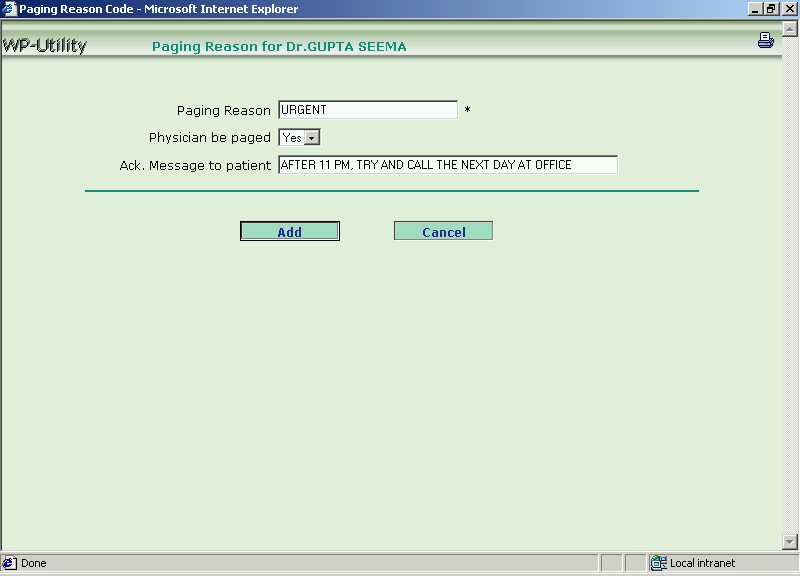
Screen 8 - Add New Paging Reason
Enter the paging reason code, physician to be paged yes/no and the message to be displayed on the pager and then click the [Add] button. [Cancel] button will take one back to the Provisioning Page.Update / Delete a Paging Reason
To update / delete an existing paging reason, click on Utilities -> Provisioning Tables -> Manage Physicians. The Paging Reason option is displayed. Against the "Physician", select the [Existing Physician Name] from the drop-down list box, and click the [Go] button.
In the search result (Refer Screen 7), various Paging Reason Codes and the Messages to be displayed on a pager are shown. Click on the radio button adjacent to [Existing Paging Reason Code] row to update / delete any paging reason. Then click [Continue] button. See the following screen.
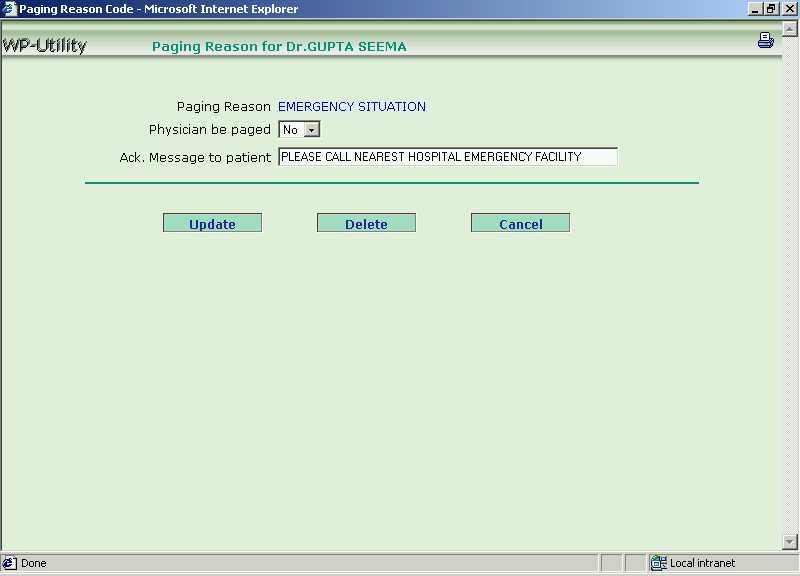
Screen 9 - Update / Delete Paging Reason
Modify the physician to be paged tag - yes/no and the message to be displayed on the pager and then click the [Update] button. Click the [Delete] button to delete the paging reason. [Cancel] button will take one back to the Provisioning Page.
Physician Hours
One sets the physician hours for a particular office.
Furthermore, the office hours can be defined for two categories of patients -
new and existing. One can either
set new schedule of office hours or update / delete the existing schedule.
The concept of reference week comes into play if a
physician's schedule is bi-weekly. The reference week serves as an anchor from
which the bi-weekly schedule is set.
To view a list of office hours schedule, click on Utilities -> Provisioning Tables -> Manage Physicians. The Physician Hours option is displayed. From the drop-down list box, select the following :-
- The [Existing Physician Name],
- The [Office of the Physician],
- The [Category of Patients - New / Existing]
Then click the [Go]
button. The following screen will be displayed.
Screen 10 - Add / Update / Delete Office Hours Schedule
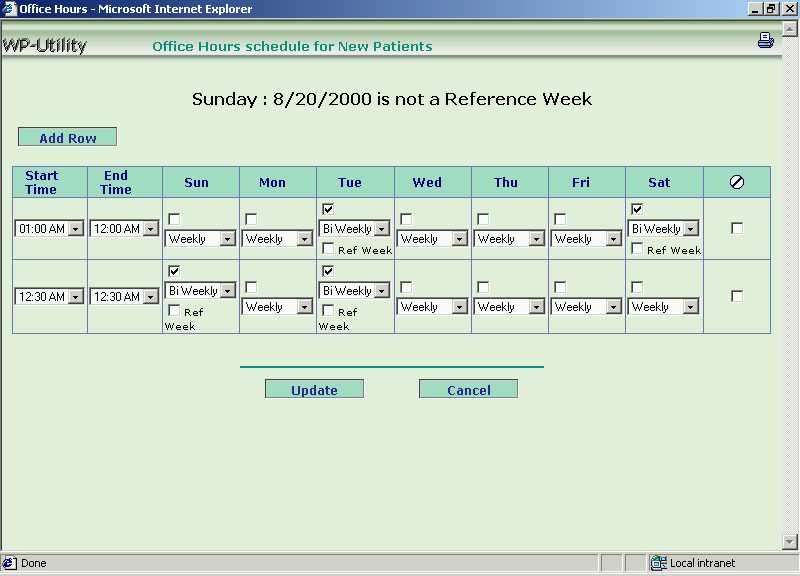
Add New Office Hours Schedule (Physician Hours) / Update / Delete the Schedule
From the office hours schedule displayed, select the "Start Time" and "End Time" and select the working week days. Click the [Update] button to update the data.
- To add new schedule, click the [Add Row] button and add another working schedule.
- To update the schedule, modify the office hours "Start Time", "End Time" and the working week days and click the [Update] button.
- To delete the schedule, tick the check box in the last column indicating [Delete].
[Cancel] button will take one back to the Provisioning Page.
This option allows one to maintain the details of all the
offices for a practice. The details maintained are the General
Information about the offices and also the scheduling information for that
office.
To provision the office details,
click on Utilities -> Provisioning Tables -> Manage Office. The Office option is displayed. Against the "Office",
select the [Existing Office Name] from the drop-down list box, and click the [Go]
button. The following screen showing the office information is displayed.
Screen 11 - Office Information
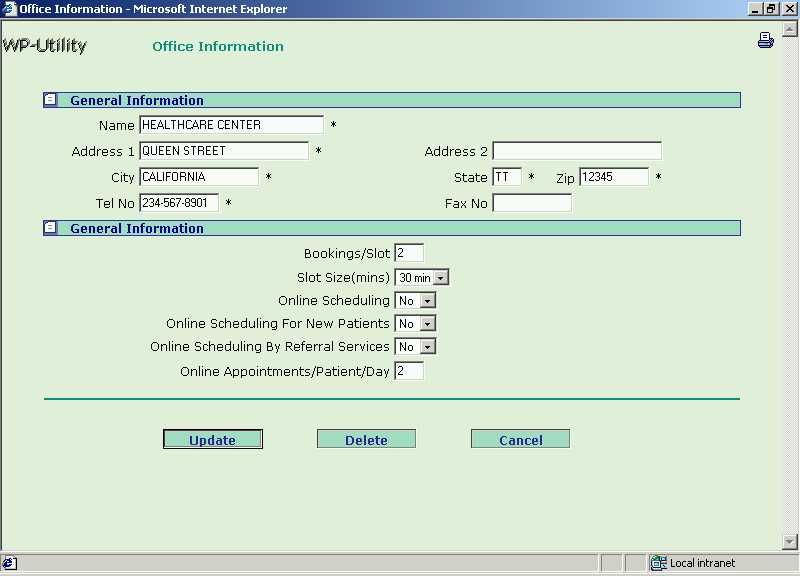
In the above screen, office information to be entered is :-
Add New Office
A new office is added through the provisioning of physician information.
Update / Delete Office
To update office details or delete an existing office, click on Utilities -> Provisioning Tables -> Manage Offices. The Office option is displayed. Against the "Office", select the [Existing Office Name] from the drop-down list box, and click the [Go] button. Refer to the screen showing the Office Information.
In the Office Information screen, update the office details and click on [Update] button to update the modified office details, or click the [Delete] button to delete the office details. [Cancel] button will one take back to Provisioning Page.
Scheduling Reason
One can add / update / delete the reasons for
scheduling appointments at a particular office. These codes are used when
an appointment is scheduled.
Add New Scheduling Reason
To add a new scheduling reason, click on Utilities -> Provisioning Tables -> Manage Offices. The Scheduling Reason option is displayed. Against the "Office", select the [Existing Office Name] from the drop-down list box, and click the [Go] button. The following screen will be displayed.
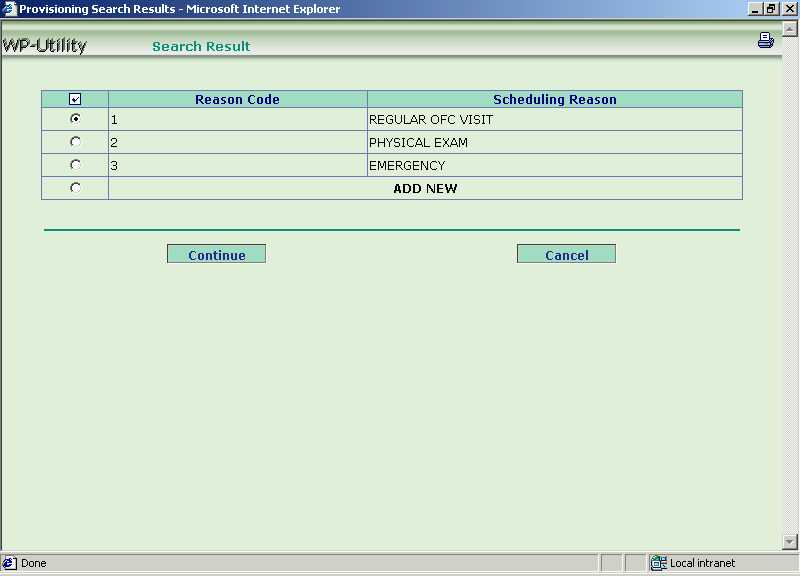
Screen 12 - Scheduling Reason Search Result
Various Reason Codes and their corresponding Reasons are displayed. Click on the radio button adjacent to [Add New] row to add new scheduling reason. Then click [Continue] button. See the following screen.
Screen 13 - Add New Scheduling Reason
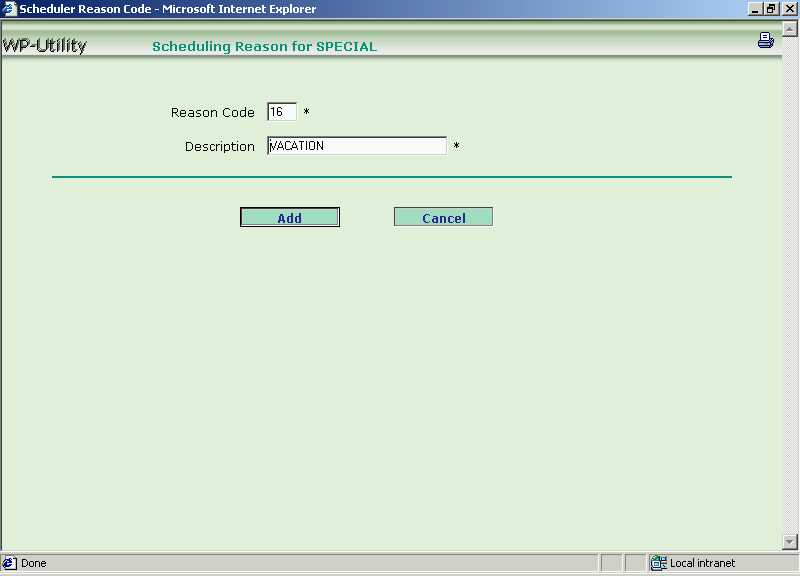
Enter the reason code and the description and click the [Add] button. [Cancel] button will take one back to the Provisioning Page without registering any changes if any.Update / Delete a Scheduling Reason
To modify an already defined scheduling reason, click on Utilities -> Provisioning Tables -> Manage Offices. The Scheduling Reason option is displayed. Against the "Office", select the [Existing Office Name] from the drop-down list box, and click the [Go] button.
In the search result (Refer Screen 12), various Reason Codes and their corresponding Reasons are displayed. Click on the radio button adjacent to [Existing Scheduling Reason] row to modify it. Then click [Continue] button. See the following screen.
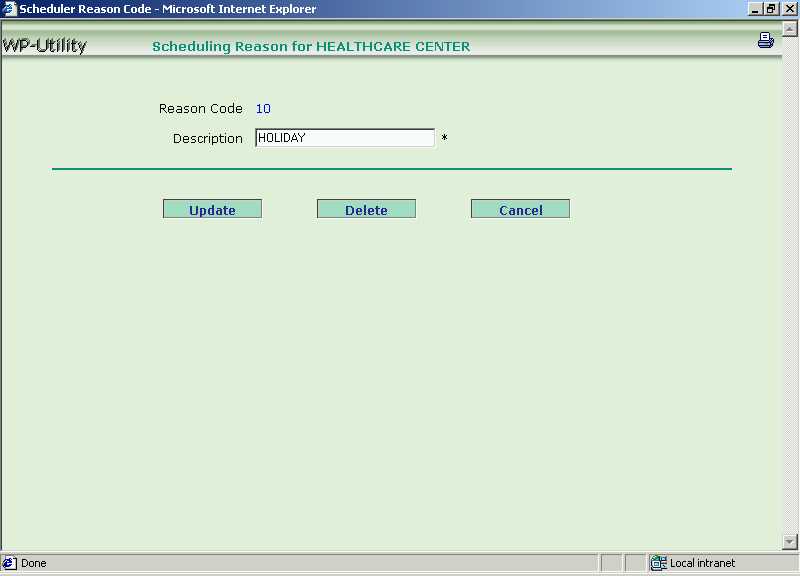
Screen 14 - Update / Delete Scheduling Reason
Modify the description and click the [Update] button. Click the [Delete] button to delete the scheduling reason. [Cancel] button will take one back to the Provisioning Page.
CPT codes
are the procedure codes. This option allows one to provision the various
procedure codes for a practice.
To provision the CPT codes,
click on Utilities -> Provisioning Tables. [CPT Codes] option is shown.
To add / update
/ delete the CPT codes, enter the search criteria (i.e. the CPT code) and click the
[Go]
button. Various CPT Codes and their corresponding Descriptions are displayed. See the
following screen.
Screen 15 - Procedure Codes Search List
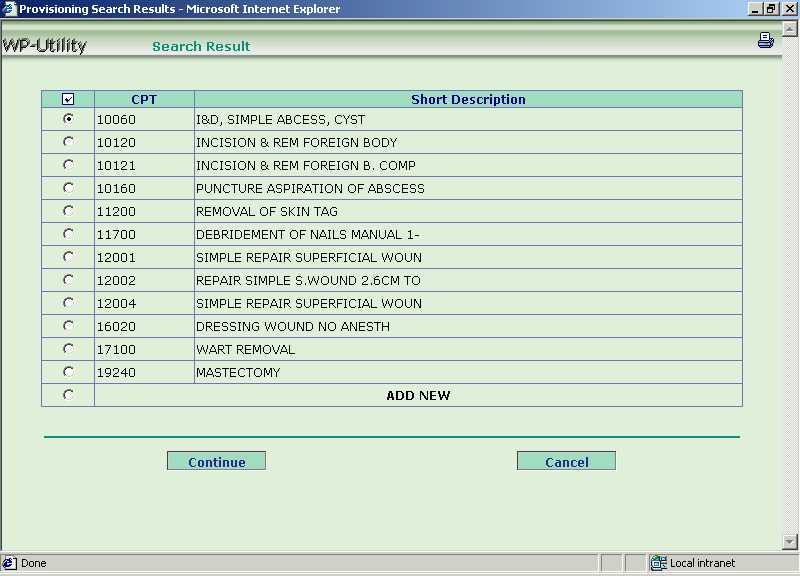
Add New CPT Code
In the above screen, click on the radio button adjacent to [Add New] row to add new CPT code. Then click [Continue] button. See the following screen.
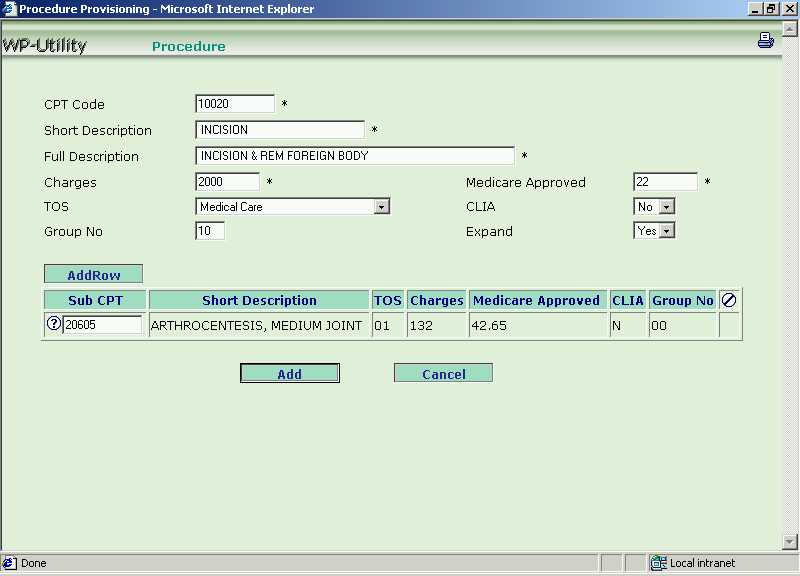
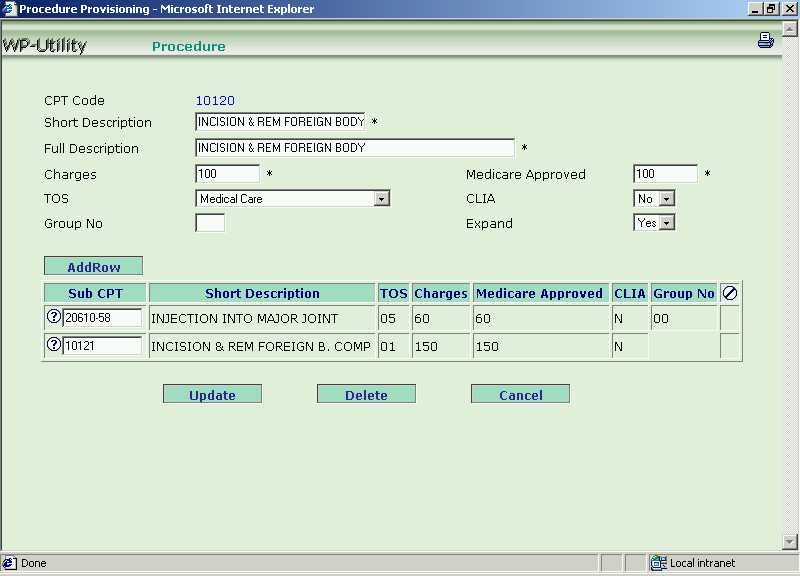
Screen 16 - Add New Procedure Code
Enter the details of the procedure.The Group No allows the grouping of CPT codes for the purpose of reporting. This is explained in the chapter on Reports .
The Expand field allows one to associate a group of real CPT codes for a given fictional CPT code entered on the screen. In order to do so, select Yes against the Expand field and then click the [Add Row] button repeatedly to associate as many real CPTs with the fictional CPT code.
The CLIA (Clinical Laboratory Improvement Amendments) field signifies if the concerned procedure is a CLIA procedure. It affects the submission and resolution of Medicare claims.
By filling in the Medicare Approved amount, adjustments are made automatically when a service detail is entered provided the insurance company is Medicare.
Finally, click the [Add] button to add the concerned CPT to the master table. [Cancel] button will take one back to the Provisioning Page.
Update / Delete CPT Code
In the "Search Result" screen - Screen 15, click on the radio button adjacent to [Existing CPT Code] row to update / delete an existing CPT code. Then click [Continue] button. See the following screen.
Screen 17 - Update / Delete Procedure Code
Modify the details of the procedure and then click the [Update] button to update the modified information or click the [Delete] button to delete the CPT code. [Cancel] button will take one back to the Provisioning Page.
ICD codes are the diagnosis codes. This option allows one to provision the various codes for the diagnosis done in a particular practice.
To provision the ICD codes,
click on Utilities -> Provisioning Tables. [ICD Codes] option is shown.
To add / update
/ delete the ICD codes, enter the search criteria (i.e. the ICD code) and click the
[Go] button. Various ICD Codes and its Description are displayed. See the
following screen.
Screen 18 - Diagnosis Code Search List
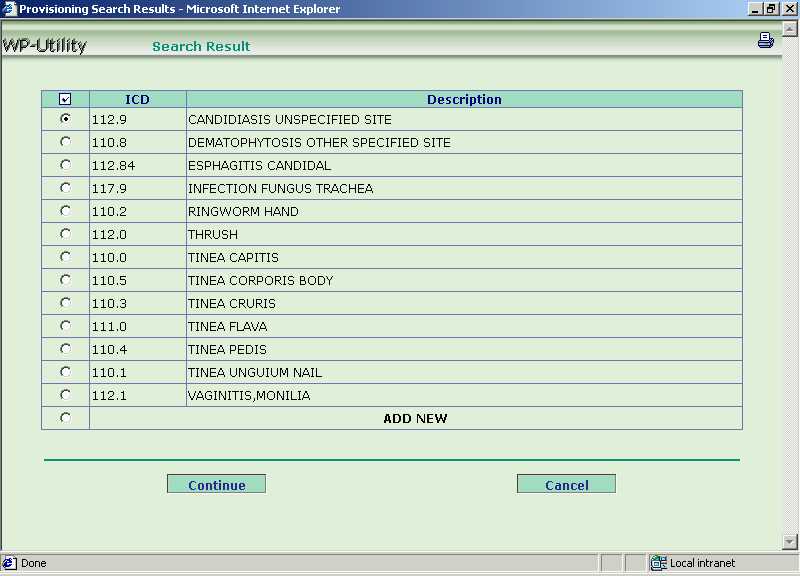
Add New ICD Code
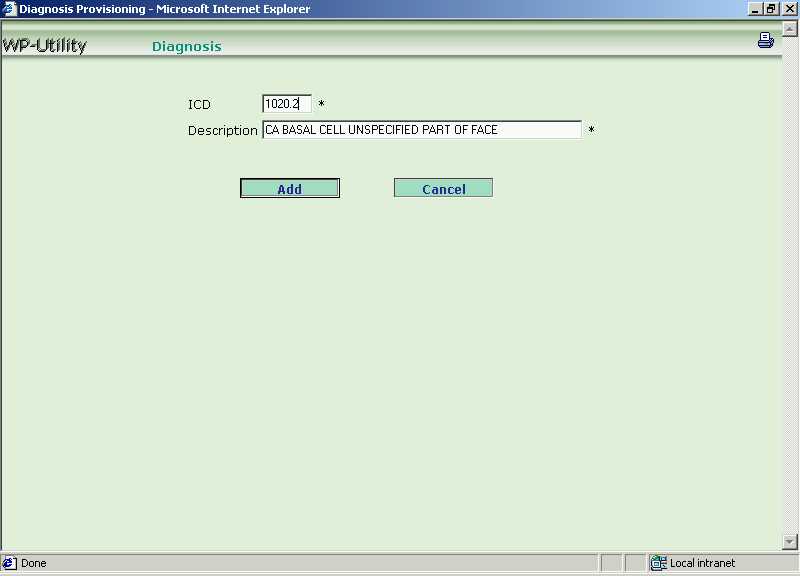
In the above screen, click on the radio button adjacent to [Add New] row to add new ICD code. Then click [Continue] button. See the following screen.
Screen 19 - Add New Diagnosis Code
Enter the new ICD code and its description. Then click the [Add] button. [Cancel] button will take one back to the Provisioning Page.Update / Delete the ICD Code
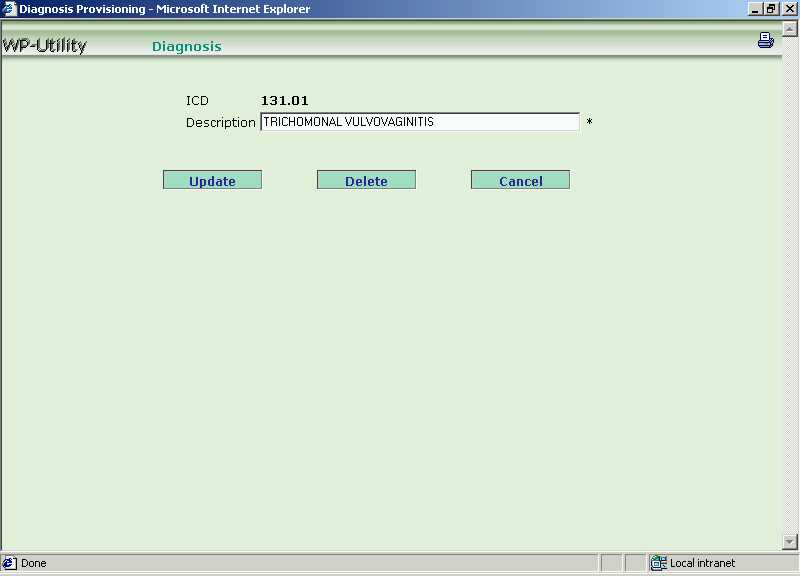
In the "Search Result" screen - Screen 18, click on the radio button adjacent to [Existing ICD Code] row to update / delete an already existing ICD code. Then click [Continue] button. See the following screen.
Screen 20 - Update / Delete Diagnosis Code
Update the description of an existing ICD Code. Then click the [Update] button, or click the [Delete] button to delete the ICD code. [Cancel] button will take one back to the Provisioning Page.
Physicians get their payment from the various insurance companies. This option allows one to provision the information of different insurance companies to whom claims will be submitted for the services rendered to the patient.
Note that a fictitious Insurance company called SELFPAY should always be created. All the patients who do not have insurance and are responsible for making their own payments will make use of this insurance company.
To provision the insurance company information,
click on Utilities -> Provisioning Tables. [Insurance Company Name]
option is shown.
To add / update / delete the insurance companies, enter the search criteria (i.e. the insurance company
name) and
click the [Go] button. Various Insurance Company Codes, its Name and
Address details are displayed. See the following screen.
Screen 21 - Insurance Company Search List
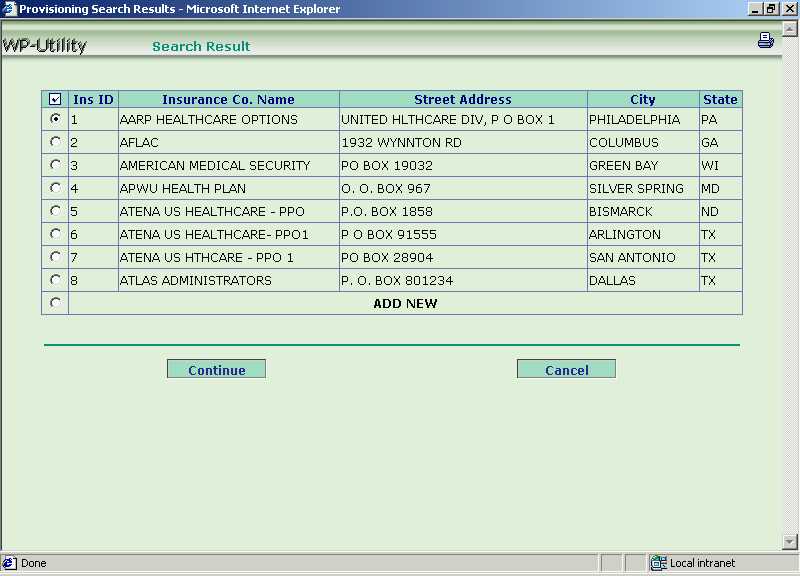
Add New Insurance Company
In the above screen, click on the radio button adjacent to [Add New] row to add new Insurance Company. Then click [Continue] button. See the following screen.
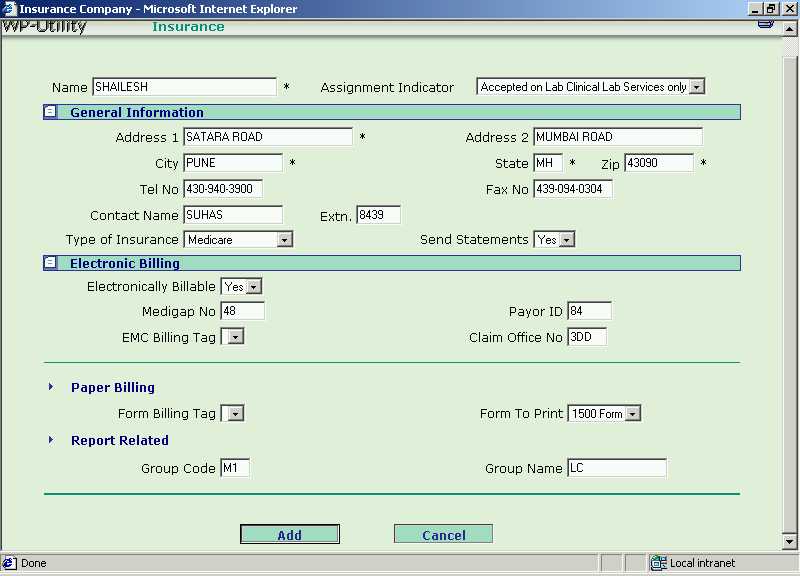
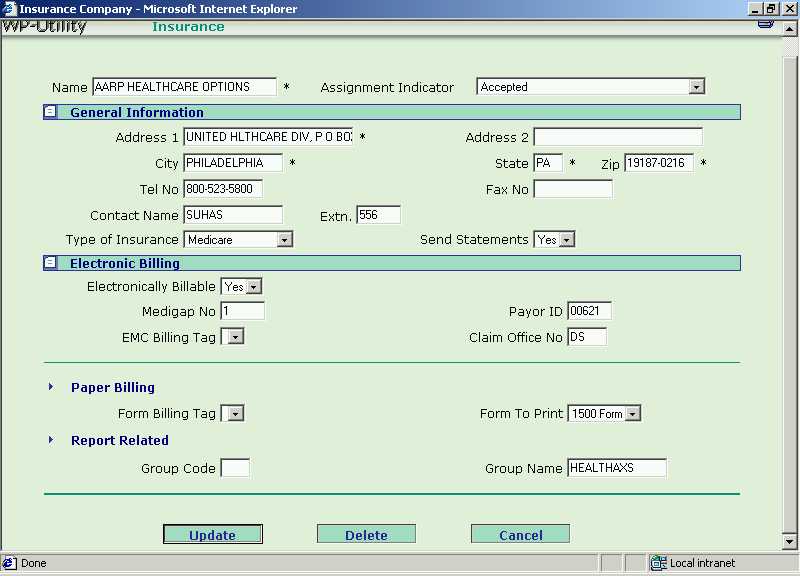
Screen 22 - Add New Insurance Company
Enter the new Insurance Company Name and its Address. With respect to billing or submission of claims the following should be noted:
- Type of Insurance - This specifies whether the concerned insurance company is Medicare or Blue Cross or Publicaid, etc. As a result appropriate claim submission rules are invoked.
- Send Statements - This governs whether statements will be sent to the guarantor for balance owed. For example, for a Publicaid patient, it is illegal to send balance statements and hence this field must be set to No.
- Electronic Billing - If claims can be sent to the concerned insurance company electronically, then the details have to be filled. The EMC Billing Tag field indicates which provider number will be submitted to this insurance company.
- Form Billing - The Form Billing Tag indicates which provider number will be printed on the form. The type of form printed is governed by the Form To Print field.
The Group Code and the Group Name fields pertain to reports. It allows one to group all the insurance companies in a few groups. For example, one can group all commercial insurance companies into one group, all HMO companies into another group, all federal programs like Medicare, Medicaid etc. into yet another group and so on. One can then run a report that shows revenue distribution by these groupings. This is explained in the chapter on Reports.
When all the information has been entered, click the [Add] button. [Cancel] button will take one back to the Provisioning Page.Update / Delete the Insurance Company
In the "Search Result" screen - Screen 21, click on the radio button adjacent to [Existing Insurance Company] row to modify the Insurance Company information or delete it. Then click [Continue] button. See the following screen.
Screen 23 - Update / Delete Insurance Company
Modify the Insurance Company details and click the [Update] button. Click the [Delete] button to delete the insurance company. [Cancel] button will take one back to the Provisioning Page.
This option allows one to provision the
information of the Referred Physicians by the practice.
To provision the referring physician information,
click on Utilities -> Provisioning Tables. [Referring Physician] option
is shown.
To add / update / delete the referring physician's details, search the
physicians on their "Last Name and optionally First Name" too and click the [Go]
button. Various referring physicians are displayed. See the following screen.
Screen 24 - Referring Physician Search Result
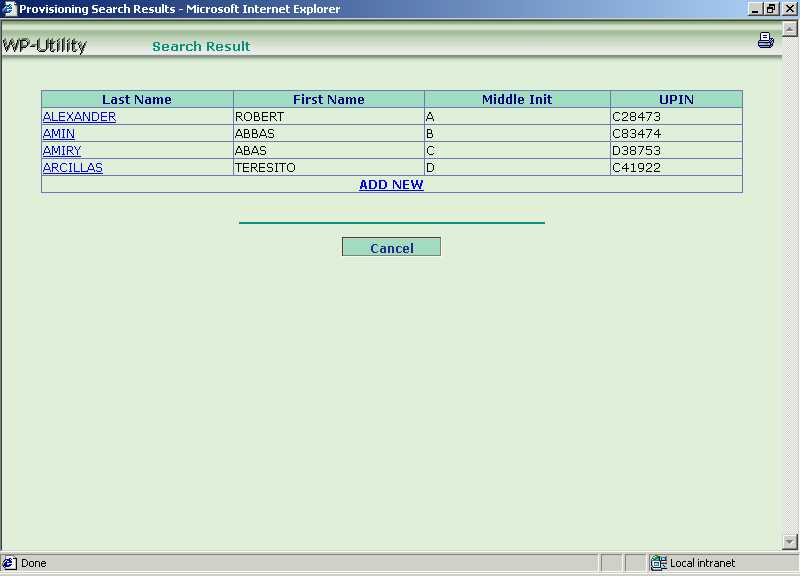
Add New Referring Physician
In the above screen, click on [Add New]. Then click [Continue] button. See the following screen.
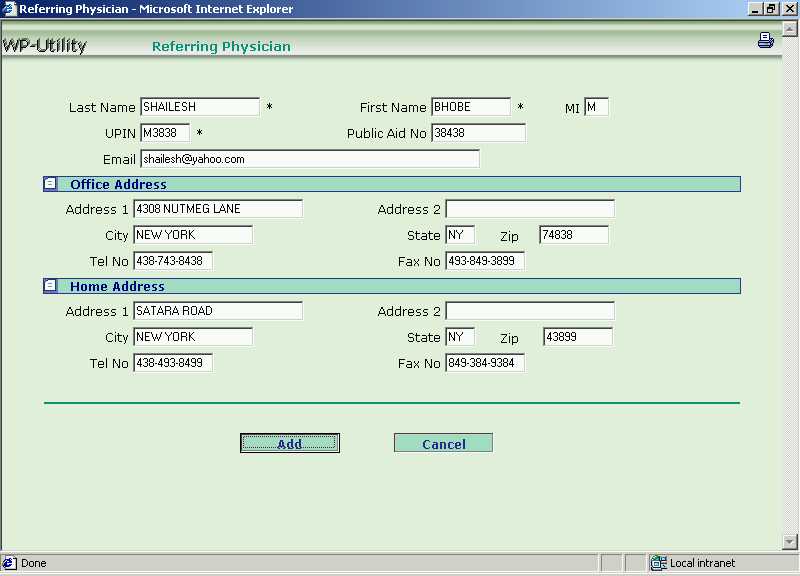
Screen 25 - Add New Referring Physician
Enter the Referring Physician's Name, UPIN and optionally the Office Address and Home Address. Then click the [Add] button. [Cancel] button will take one back to the Provisioning Page.Update / Delete the Referring Physician
In the "Search Result" screen - Screen 24, click on [Last Name] of existing referring physician. Then click [Continue] button. See the following screen.
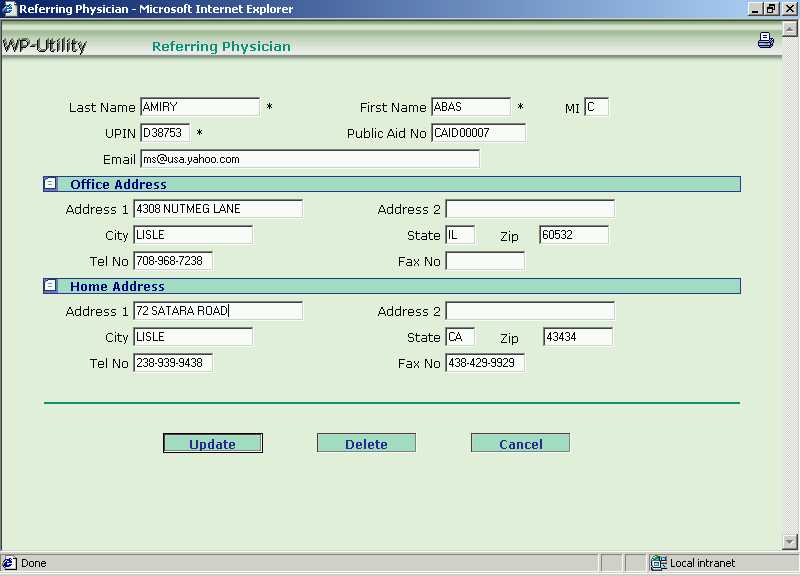
Screen 26 - Update / Delete Referring Physician
Update the Referring Physician's details, and then click the [Update] button. To delete the referring physician, click [Delete] button. [Cancel] button will take one back to the Provisioning Page.
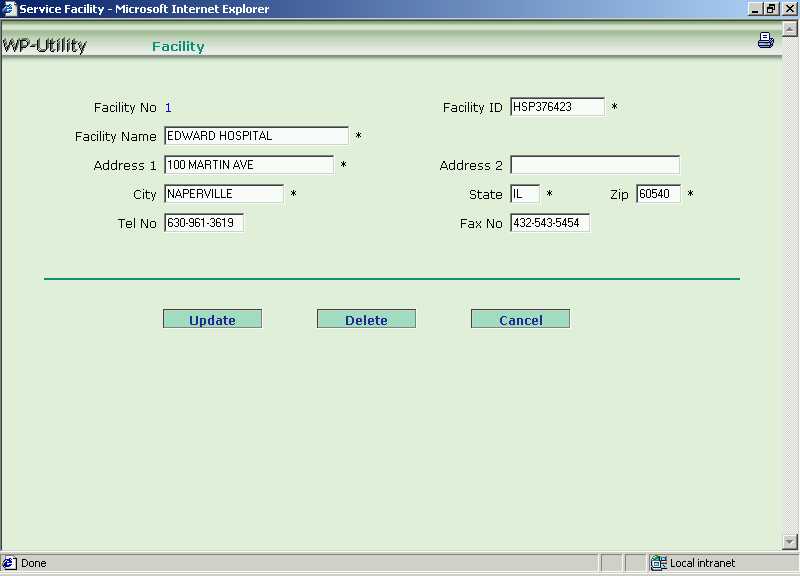
Service Facility is the hospital / place where
service is provided by the physicians. This option allows one to provision the
information of such service providing hospitals.
To provision the service facility information,
click on Utilities -> Provisioning Tables. [Facility Name] option
is shown.
Add New Facility
To add a new facility to the domain, select [New Facility] from the drop-down list box and click the [Go] button. The following screen is displayed.
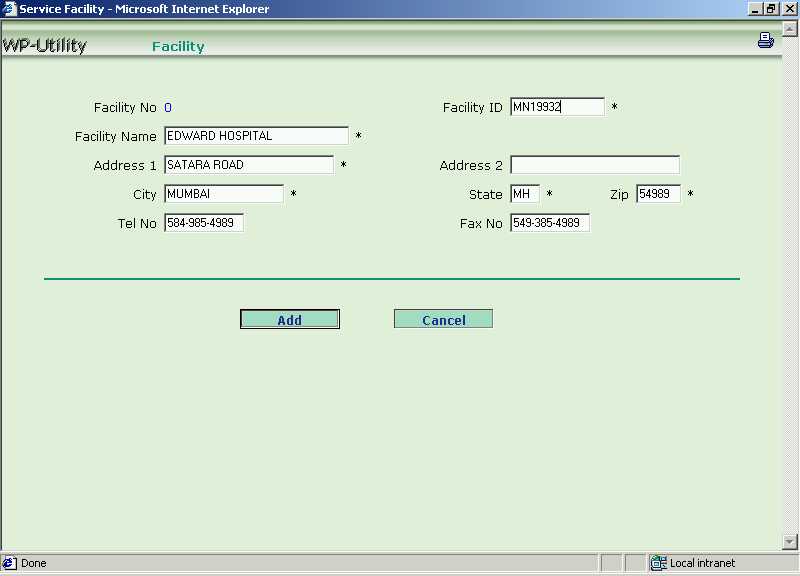
Screen 27 - Add New Facility
In the above screen, enter the Facility Name, its Address and ID. The ID is the facility's Medicare number. Then click the [Add] button. [Cancel] button will take one back to the Provisioning Page.
Update / Delete New Facility
To update / delete the details of service facilities, select the [Existing Service Facility] from the drop-down list box and click the [Go] button. The following screen.
Screen 28 - Update / Delete Service Facility
Update the details of the service facility / hospital, and then click the [Update] button. To delete the service facility, click [Delete] button. [Cancel] button will take one back to the Provisioning Page.