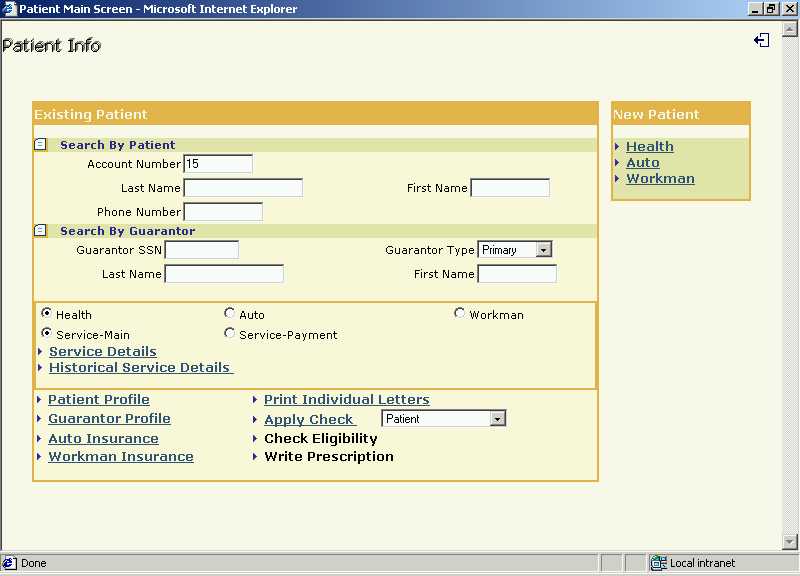
Screen 1 - Patient and Guarantor Search Page
Managing Patients and Guarantors
This section explains how the patient and guarantor profiles are created and maintained. Along with the guarantor profiles, the insurance that they subscribe to is also tracked so that claims can be properly routed.
Details of the services provided by the physician to the patient are kept in three folders depending upon the reason for the services. Health related services are kept in the Health folder and there is a corresponding guarantor for these services. Automobile accident related services are kept in the Auto folder and in this case, the patient is the guarantor. Services pertaining to work related accident are kept in the Work folder and in this case too, the patient is the guarantor.
Patient and guarantor information / profile is presented on separate screens. When a new patient is added to the practice, the user is taken from the patient profile screen to the guarantor profile screen.
To provision the patient information / profile,
click on "Patient" option. The "Patient Info Page"
is displayed.
Screen 1 - Patient and Guarantor Search Page
View / Update Existing Patient Profile
In the above screen - Screen 1, give the search criteria to search the patient
from the existing list whose details are to be viewed. The physician can search
the patient on:-
Search by patient criteria is the preferred means of search. In addition, search by the
patient Account Number is the fastest. On giving any of the above selection criterion,
click the [Patient Profile]. The following screen giving the list of
patients according to the given selection criteria is displayed.
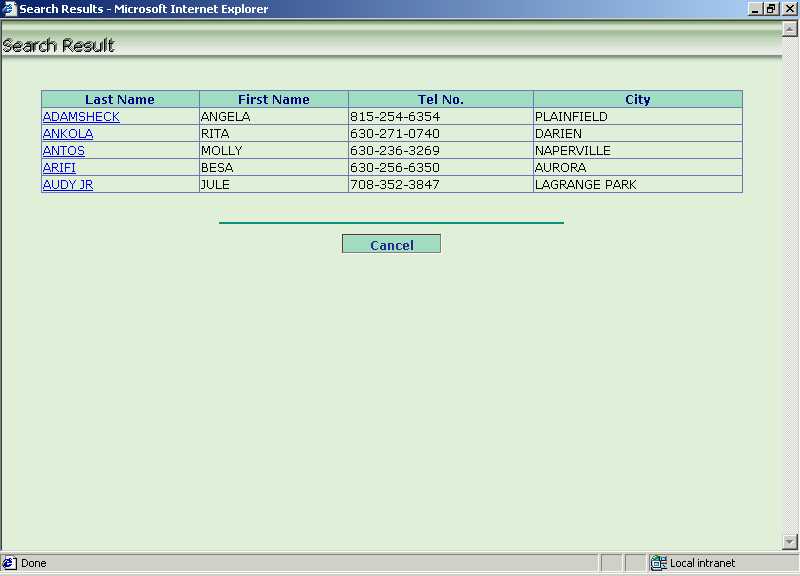
Screen 2 - Patient Profile Search Result

Click the link on [Last Name] to view the patient profile. See the
following screen.
Screen 3 - Patient Profile
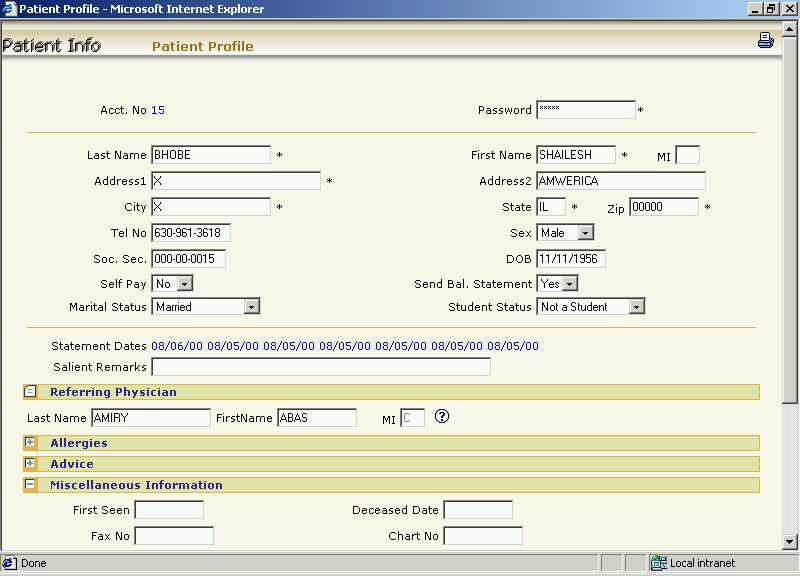
The patient
profile will contain :-
The Send Bal. Statement field governs whether Balance Statements will be sent to this patient's guarantor if there is balance owed. The Self Pay field indicates if the patient is also the guarantor and has no insurance. In this case, the SSN field is mandatory.
If any of the details are to be modified, click on [Update] button to update the changes made. The [Cancel] button will take one back to the Patient and Guarantor Search Page.
Add New Patient Profile
To add information of a new patient, on the Patient and Guarantor Search Page, click on [Health]
/ [Auto] / [Workman] option under the "New Patient"
block.
If a patient is being seen for
health problems, click the [Health] option. If the patient comes due to an
automobile injury, click the [Auto]
option. If the patient comes due to injury at work place, click the [Workman] option.
The following screen is displayed when clicked on the [Health] option .
Screen 4 - Add New Patient
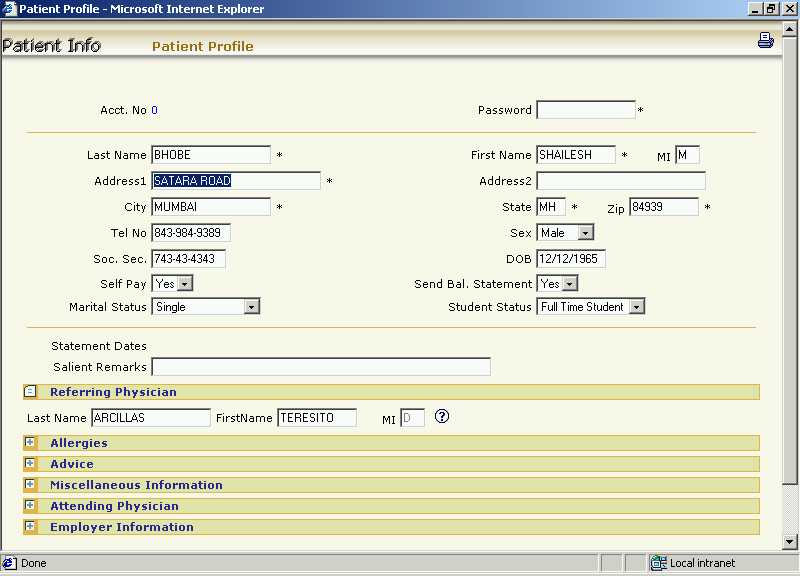
Fill in the patient details as in Screen 3, and click the [Submit] button
to add the details. [Continue] button will take you to the Guarantor
Profile screen. The [Cancel] button will take back to
the Patient and Guarantor Search Page.
Refer to Screen 6 - Guarantor Profile below. You have to add the
information of guarantor for the newly added patient.
On the Guarantor Profile Screen, click the [Add] button to add the
guarantor details. [Cancel] will take one back to the Patient and Guarantor Search Page.
Guarantor Profile for Health Insurance
This option allows one to provision a guarantor's information / profile for a patient. One can also add new guarantors for a patient. WebPractice supports upto two guarantors per patient. Old historical insurance company data associated with a guarantor is also retained for reference purposes.
View / Update Existing Guarantor Profile
On giving any of the selection criterion as in Screen 1, click the [Guarantor
Profile]. The following screen giving the list of patients according to the
given selection criteria is displayed.
Screen 5 - Patient Search Result
Click the link on [Last Name] to view the guarantor information of the
patient selected. The
following screen showing the Guarantor Profile will be displayed.
Screen 6 - Guarantor Profile
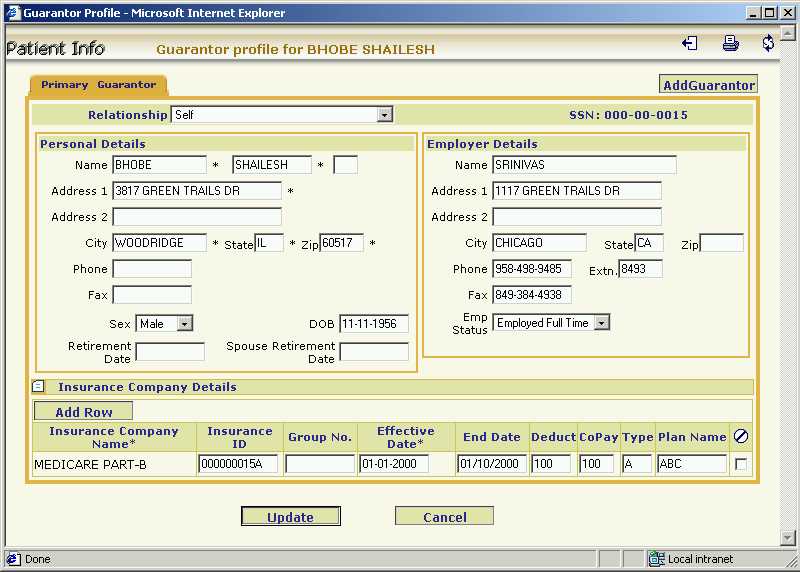
The
guarantor profile will contain :-
If any of the above details are modified, click on [Update] button to update the changes made. The [Cancel] button will take one back to the Patient and Guarantor Search Page.
Add a New Guarantor
To add a new (i.e. secondary) guarantor to a patient, click on [Add Guarantor] button in
the above screen - Screen 6. Add
the secondary guarantor details and click the [Update] button to add a new
guarantor for the patient. The [Cancel] button will take one back to
the Patient and Guarantor Search Page.
* Note :- The Guarantor's Information cannot be deleted.
Adding a New Insurance Company for the
Guarantor
To add a new insurance company for the guarantor, click on [Add Row]
button under the "Insurance Company Details" block in the
Screen 6. Add the
insurance company details and click the [Update] button to add a new
insurance company for the guarantor.
Update / Delete an Insurance Company of the Guarantor
To modify the insurance company information, modify the details and click the [Update]
button. To delete an existing insurance company of the guarantor, click the
check box in the last column indicating [Delete], under the "Insurance
Company Details" block. Then click the [Update] button to update
the insurance company details.
Guarantor Profile for Auto Insurance
This option allows one to provision the insurance
company details of patients in the case of an automobile injury. For automobile insurance,
the patient is the guarantor.
View / Update / Delete Auto
Insurance
On giving any of the selection criterion as in Screen 1, click the [Auto
Insurance]. The following screen giving the list of patients according to the
given selection criteria is displayed.
Screen 7 - Patient Search Result
Click the link on [Last Name] to view the auto insurance information for
that patient. See the following screen.
Screen 8 - Auto Insurance Information
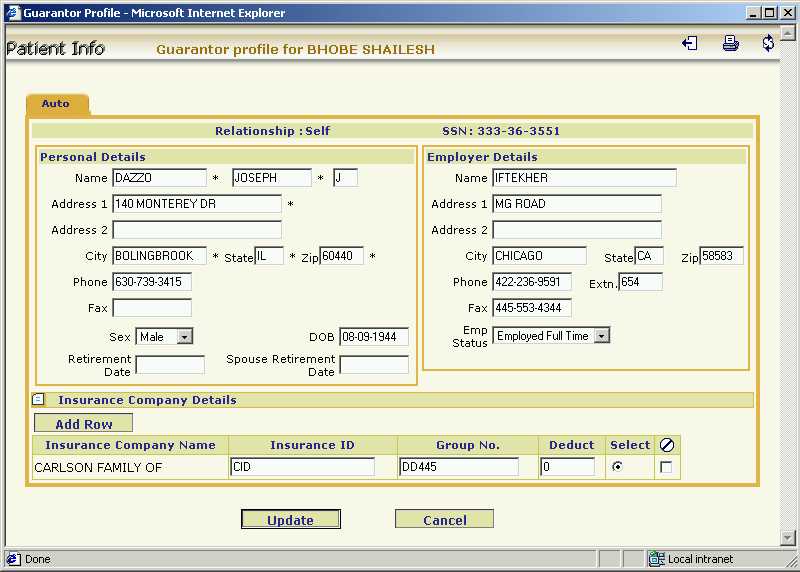
The physician can view the following details:-
If any modifications are done, click on [Update]
to update the changes made. To delete an already existing insurance company of the
patient, click the
check box in the last column indicating [Delete], under the "Insurance
Company Details" block. Then click the [Update] button to update
the insurance company details. The [Cancel] button will take one back to
the Patient and Guarantor Search Page.
Adding a New Insurance Company
To add a new insurance company, click on [Add Row]
button under the "Insurance Company Details" block in the
Screen 8. Add the
insurance company details and click the [Update] button to add a new
insurance company for the patient.
Guarantor Profile for Workmen Compensation Insurance
This option allows one to provision the insurance
company details of patients in the case of injury at their workplace. For workmen
compensation too, the patient is the guarantor.
View / Update / Delete Workman
Insurance
On giving any of the selection criterion as in Screen 1, click the [Workman
Insurance]. The following screen giving the list of patients according to the
given selection criteria is displayed.
Screen 9 - Patient Search Result
Click the link on [Last Name] to view the workman insurance information
for that patient. See the following screen.
Screen 10 - Workman Insurance Information
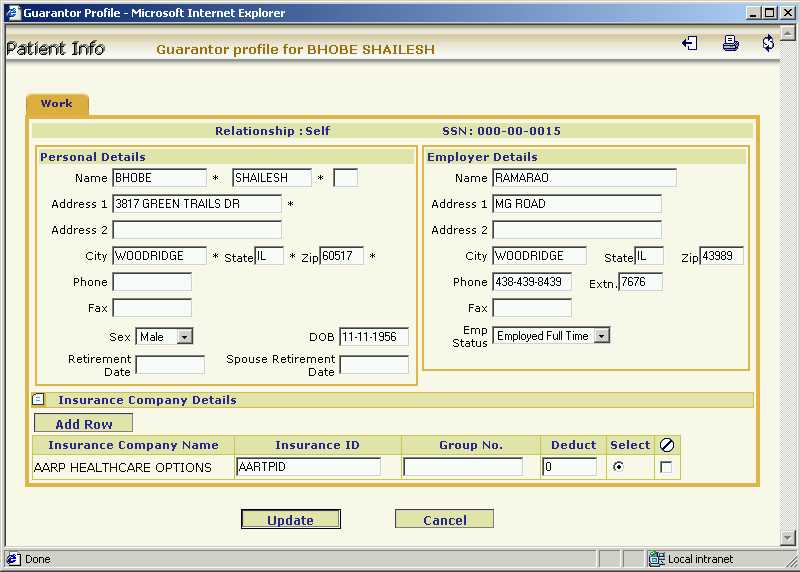
The physician can view the following details:-
If any modifications are done, click on [Update] to update the changes made. To delete an already existing insurance company of the patient, click the check box in the last column indicating [Delete], under the "Insurance Company Details" block. Then click the [Update] button to update the insurance company details. The [Cancel] button will take back to the Patient Info Page.
Add a New Insurance Company
To add a new insurance company, click on [Add Row]
button under the "Insurance Company Details" block in the
Screen 10. Add the
insurance company details and click the [Update] button to add a new
insurance company for the patient.