Managing Service Details
Service
details keep track of services provided by the physician to the patient. The
service information also includes the details of payments made by the patients
and the insurance companies. The information for each service is organized into
four folders for ease of viewing. The first one contains the main service
details and patient payment. When a new service is being added, only this folder
can be accessed and the others left alone. The second folder contains payment
details from the insurance companies and adjustments. This folder will be
accessed when payments are received from the insurance companies. The third folder contains the
dates the insurance companies were billed. There are at most three
dates associated with each submission of claim to the insurance company. The first one shows
the very first time the claim was submitted. The last one shows the most recent
claim submission. The middle one shows the submission date just before the most recent one. Note that
all the entries in this tab are display only. The fourth tab contains miscellaneous items such
as specification of ailment if any or a changing of the referring physician
or extra narrative to be associated with each service detail.
To manage the service details,
click on "Patient" option. The "Patient and Guarantor Search Page"
is displayed.
Screen 1 - Patient and Guarantor Search Page
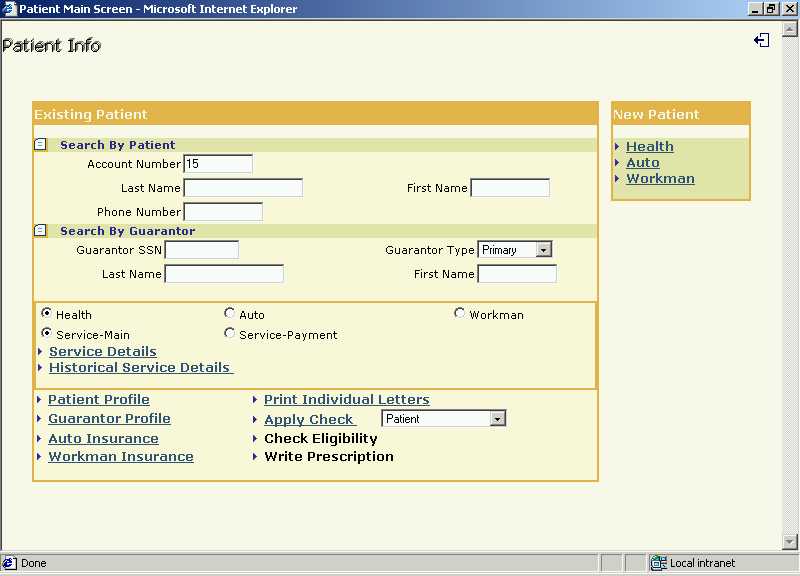
On the above screen, first select the insurance type from Health / Auto
/ Workman and Service-Main / Service-Payment from the available options, by clicking
the radio button adjacent to the options. Doing so allows one
to directly go to the service details screen under the correct tab.
Also give the search criteria to search the patient
from the existing list whose details are to be viewed. The physician can search
the patient on:
- Search By Patient Details
- Account Number
- Last Name and First Name
- Phone Number
- Search By Guarantor Details
- Guarantor SSN (Social Security Number)
- Last Name and First Name
Then
click on [Service Details] to view / enter the service details. A list of
patients will be displayed depending upon the search criteria given.
Screen 2 - Patient Search Result
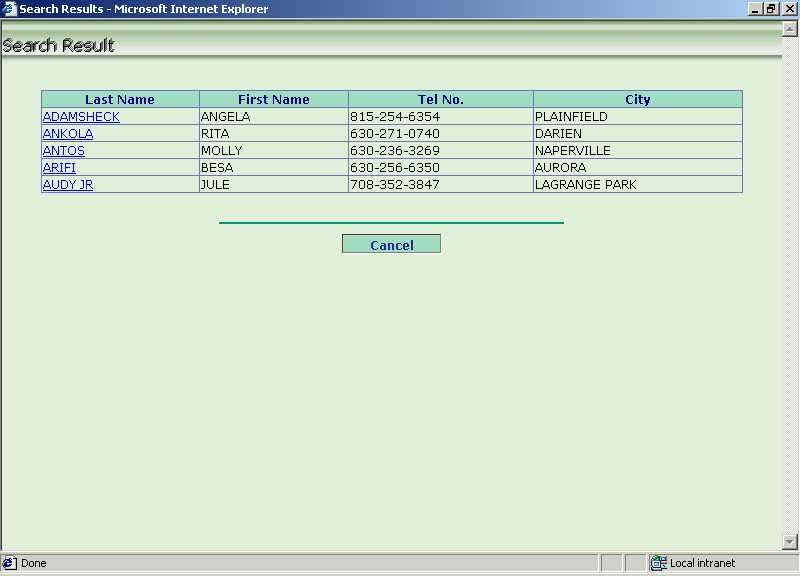
In the above screen, click on
the link on [Last Name] to view the service details of that patient. See
the screen of "Service-Main Details" - Screen 3.
Depending
upon the selection of the options, the respective tab will be displayed. By
default the one views the "Service-Main" for Health
insurance. See the following display (Refer Screen 3).
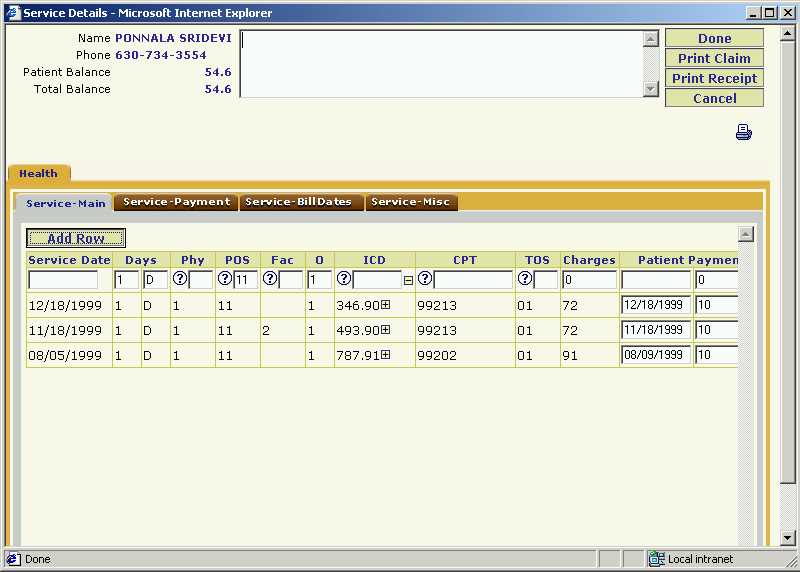
Service-Main
This option gives the main details of services
provided to the patient. It also shows the patient payment in case the patient makes
the payment for the portion that he is responsible for. When adding a new service, only the
details in this part (i.e. under this tab) needs to be filled in.
Screen 3 - Service-Main
Add New Service Details
In the Screen 3, click on the [Add Row] button to
add new service details. See the
following screen.
The service details include :-
- Service Date,
- Number of consecutive days the same service is provided. Default is one.
- Physician Group Member ID. This column is displayed only
for a Group Practice containing multiple physicians.
- Place Of Service (POS),
- Facility / Hospital ID where the service is provided,
- Order (O). This allows one to order or arrange the services
provided on any single service date.
- Diagnosis Code (ICD),
- Procedure Code (CPT),
- Type Of Service (TOS). This is associated with the CPT code.
- Charges. This is associated with the CPT code.
- Date of Patient Payment,
- Amount Paid by the Patient,
- Balance Amount. This is display only.
Click on [Done]
button to add the service details. The [Cancel] button will take back to
the Patient and Guarantor Search Page.
Service-Payment
This option gives the details of payment to be
done by the insurance companies. See the following screen.
Screen 4 - Service-Payment
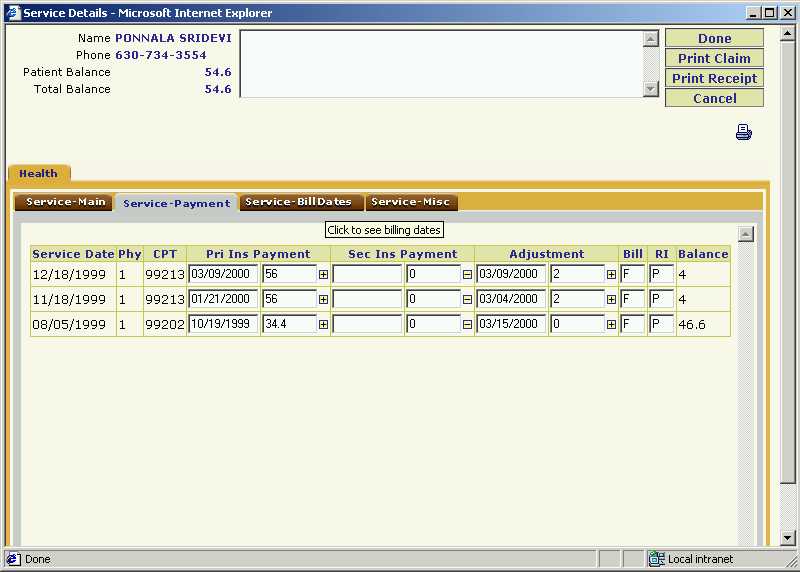
The screen displays the following details :-
- Service Date, Physician Group Member ID and CPT code
are display only and are displayed here to serve as reference.
- Payment received from the Primary and Secondary
Insurance Company.
For each the first field is the payment date and the second field is the amount.
- Billing Party. This indicates to whom the
bill is to be sent. It can be "P" for Primary Insurance
Company, "S" for Secondary Insurance Company,
"R" for Receipt to be given to the patient or "X"
for indicating Do not Bill.
- Responsibility Indicator. This indicates the
responsibility of payment. It can be "P" for patient's
responsibility, "Blank" indicating the responsibility
of the Insurance Company or "C" for (Collection Agency).
- The Balance Amount. This is display only.
Click on [Done]
button or the [Cancel] button to go back to
the Patient and Guarantor Search Page.
Apply Check
The patient or the primary or the secondary insurance company will pay the amount for various
services provided by the physician by cash, check or credit card.
The amount received is to be adjusted against the various services provided.
To apply check,
click on "Patient" option on the Practice Home Page. The "Patient
and Guarantor Search Page"
is displayed.
On the Screen 1, for the option [Apply Check] first select the paying
party from the drop-down list box adjacent to the option name. The check can be
received from Patient, Primary Insurance Company or Secondary Insurance Company.
Then, click on [Apply Check] option.
A list of patients will be displayed depending upon the search criteria given.
See the following screen displaying the list of patients.
Screen 5 - Patient Search Result
Click on the link on [Last Name] to enter the check details for that
patient. See the following screen.
Screen 6 - Check Details
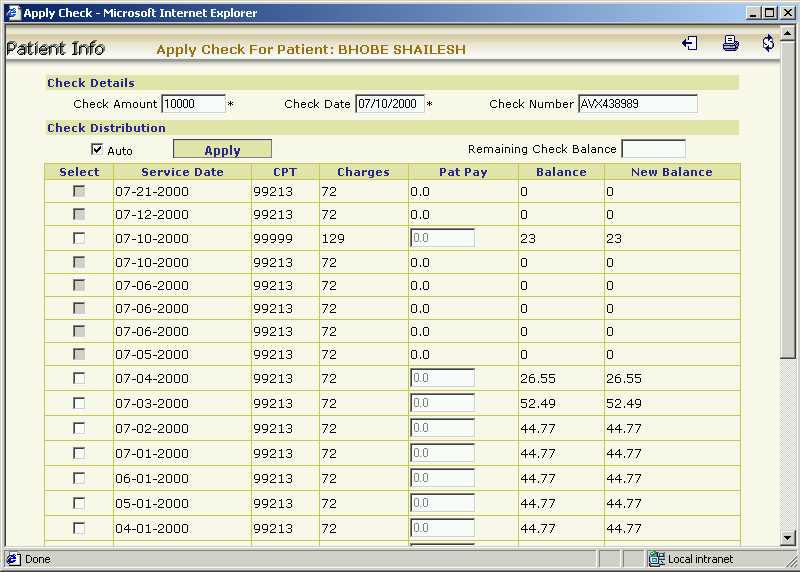
In the above screen, enter the following details :-
- Check Amount,
- Check Date,
- Check Number - If check number is not
entered, the mode of payment is treated as "Cash".
- Check Distribution Indicator. The amount of
the check can be distributed automatically or manually for
the services provided.
To manually distribute the check
amount, tick the check boxes adjacent to the services and then enter the
amount in the "Patient Payment" column. If the amount is to
be distributed automatically, tick the check
boxes adjacent to such services, click "Auto"
distribution indicator and then click [Apply]. The total amount of
check will be distributed according to its balance. The remaining amount of
the will be displayed in the "Remaining Check Balance" field.
The amount won't be applied, unless the remaining check balance is "0". And in turn, the amount will not be displayed in "Service-Payment" screen of "Service
Details" option.
E.g., In the
above screen, the "Check Amount" is Rs. 10,000/- If it is
to be distributed automatically among the available services, first select
the services and then click the "Check
Distribution Indicator" - 'Auto'. The it will be distributed
according to the balance of the selected services.
If the "Remaining Check Balance"
is "0", click on [Submit] button. The amount
will thus be displayed in "Service-Payment" screen of "Service
Details" option. The [Cancel] button will take back to the Patient
and Guarantor Search Page.
Service-Bill Dates
This option displays the billing dates of
primary and secondary insurance companies. There are at most three
dates associated with each submission of claim to the insurance company. The first one shows
the very first time the claim was submitted. The last one shows the most recent
claim submission. The middle one shows the submission date just before the most recent one.
Note that all the entries in this tab are display only. See the screen below.
Screen 7 - Service-Bill Dates
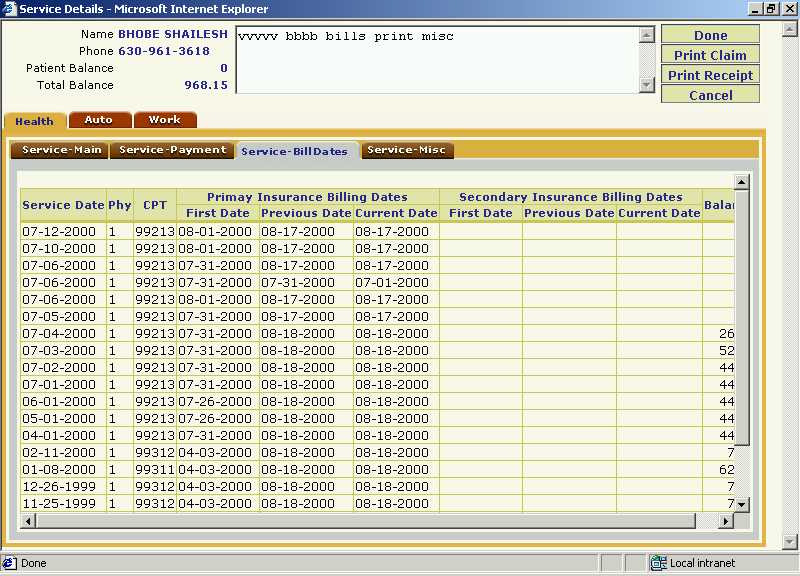
The billing details displayed are :-
- Service Date, Physician Group Member ID and CPT code
are display only and are displayed here to serve as reference.
- First Billing Date for Primary / Secondary
Insurance Company,
- Previous Billing Date Primary / Secondary
Insurance Company,
- Current Date Primary / Secondary Insurance
Company,
- Balance Amount. This is display only.
Click on [Done]
button or the [Cancel] button to go back to
the Patient Info Page.
Service-Miscellaneous Details
Invoke this tab for changing the Referring Physician or
associating an ailment with the service detail. See the screen below.
Screen 8 - Service-Miscellaneous
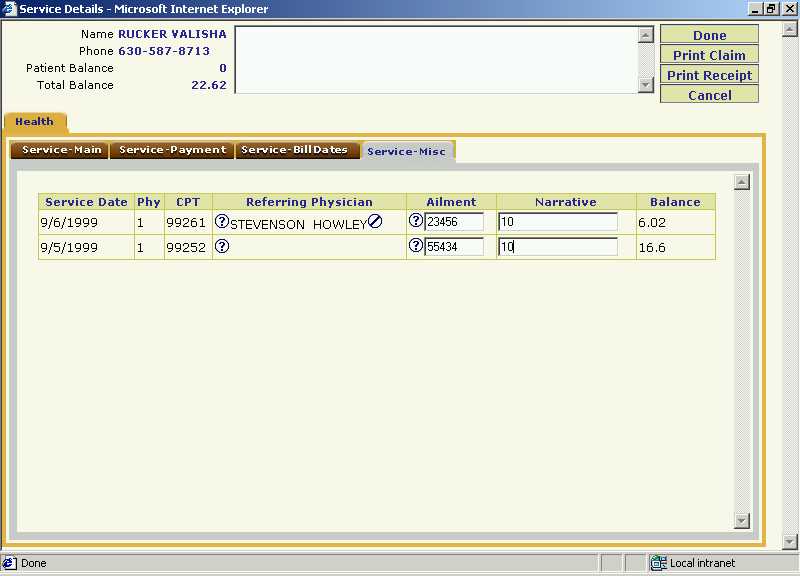
The miscellaneous details that can be viewed or entered are :-
- Service Date,
- Physician who gave the service,
- Procedure Code,
- Referring Physician,
- Ailment details - The ailment details give
the information of illness of the patient. Click the '? icon'
adjacent to the "Ailment Details" field. It will take you to the
screen (Screen 9 - Ailment Details) given below which allows you to
view the details of the existing ailments, or add new ailment details for a
patient. If the illness details does not exists, add the details and then
those will be available to select for the next patient.
- Balance Amount.
Screen 9 - Add Ailment Details

In the above screen, enter all the details related to the illness of the
patient and then click the [Add] button. [Cancel] will take one
back to the Service Details Page.
Partial Payments
Sometimes the patient or on rare occasions the primary and
secondary insurance companies may make the payment in installments. This is known as
Partial Payment. Each partial payment is separately entered and tracked. On the completion
of partial payment entry/entries, the focus shifts to the tab in the service details screen.
What is shown here in the amount column is the sum of all the partial payments. The date
column shows the date on which the last partial payment was made.
If the patient does the payment in installments, the partial payment amount can
be entered through the "Service-Main" option. Expand the column
of "Patient Payment" of Service-Main screen by clicking on the
- or + image. The
following Patient Partial Payment screen is displayed.
Screen 10 - Patient Partial Payment
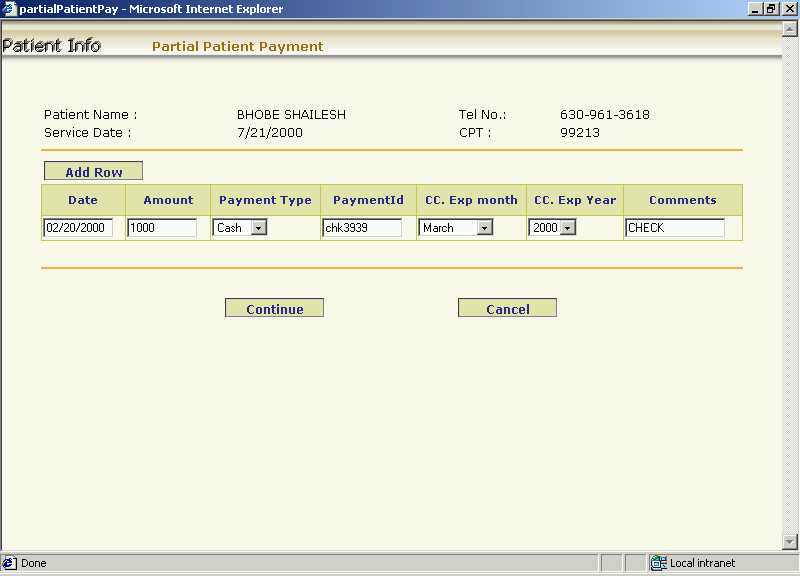
By clicking on the [Add Row] button repeatedly, enter as many entries as there are
partial payments.
The physician may receive payment in installments from insurance company also.
This partial payment can be entered through the "Service-Payment"
option. Expand the column of "Primary Insurance Payment" of Service-Payment
screen by clicking on the - or + image. The following Partial Primary Insurance Payment screen is displayed.
Screen 11 - Partial Primary Insurance Payment
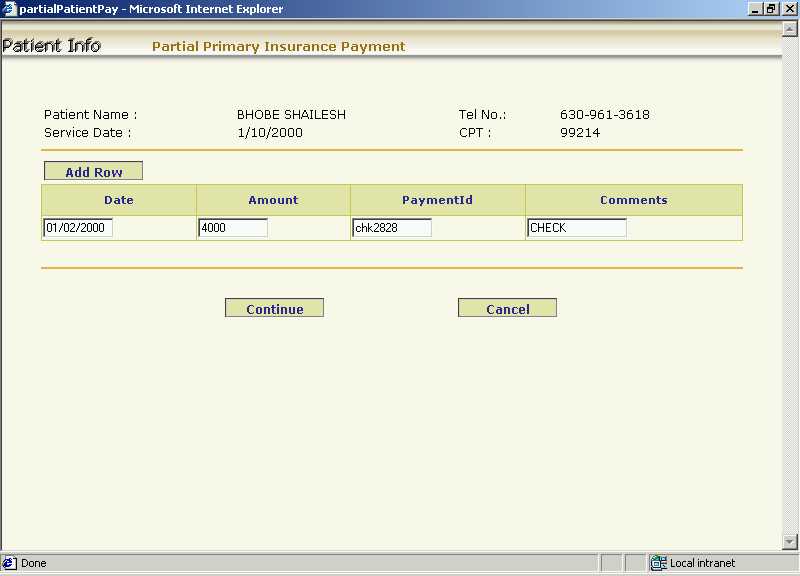
By clicking on the [Add Row], enter the partial payment.
Follow similar procedures to create partial payment entries for
the secondary insurance if necessary.
The physician may want to adjust the due amount from the patient or insurance company in some cases. Sometimes, the patient or the insurance
company may pay the partial amount of the actual bill
amount. The amount left is ignored and is not paid. The physicians in such case,
write off the partial amount (if the amount is small) and make the balance zero
for that patient. This adjustment amount can be entered through the "Service-Payment"
tab. Expand the column of "Adjustment" of Service-Payment
screen by clicking on the - or + image. The following Partial Adjustment screen is displayed.
Screen 12 - Partial Adjustment
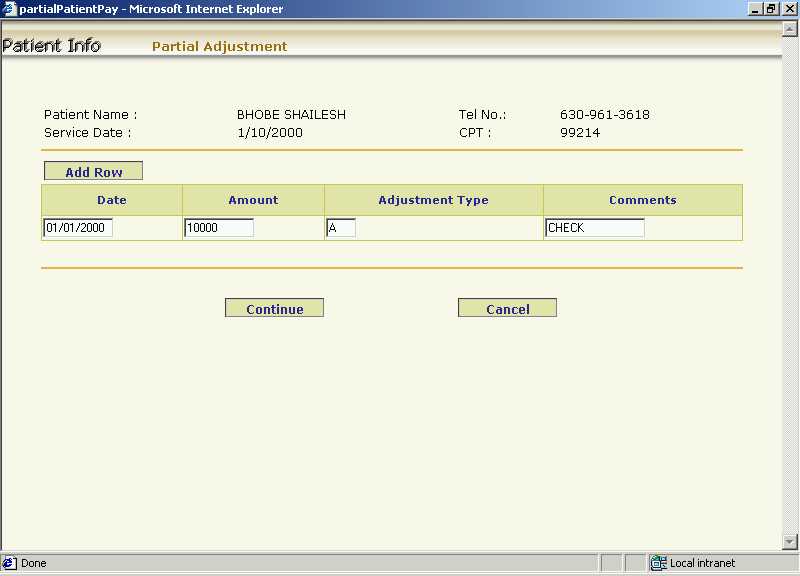
By clicking on the [Add Row], enter the partial adjustment details,
such as, the Date of Adjustment, Amount Adjusted, Adjustment Type and the
Comments specifying the reason for adjustment. One can add any number of
adjustment amounts for the particular patient.